The math that explains your photo filter

You just took the world's best selfie. The selfie with a capital S. The one that will revolutionize your Facebook feed. But wouldn't it be nicer with a little more luster in the colors, a filter that creates more light over the face or maybe a grayscale version? While you click and swipe on your phone, linear algebra takes place under the hood. Join us as we zoom in on the mathematics of digital photography.
From analog to digital
To understand the mathematics behind photo editing, we must first understand how a computer stores and interprets images. The first step is to imagine each image composed of small solid colored squares – pixels.
The second step is to assign each pixel a number that describes its tint. Or rather three numbers: a number for each of the basic colors red, green and blue. Does it sound strange to be able to describe countless color shifts with only red, green and blue? Perhaps! But with access to different intensities of red, green and blue light, you can actually mix more than 16 million colors.

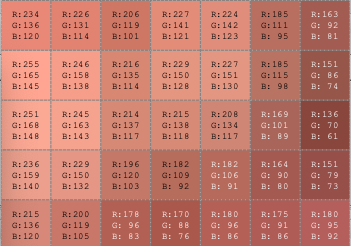
The intensity of the colors red, green and blue is given as numbers between 0 and 255. In this way, each pixel's tint becomes a number triple, (red, green, blue). The number triple (255, 0, 0) is bright red, (0, 255, 0) is bright green and (0, 0, 255) is intensely blue. If we combine these colors in other proportions, we get other colors. If we take a section of a few pixels around my mouth, we get, for example, the following color triplets.


In the eye of the computer, your selfie is thus a large table of numbers and these are the numbers you play with when you select filters, use the magic wand tool or adjust the shadow in your photos. But how does it work in practice? Let me show you some of the methods in four examples.
1. Red
Some filters in photo apps like Instagram or Snapchat let you play with the color tones of the photo. In this way, you can give the sunset an even more glowing red tone or intensify the blue color in your underwater image. How does it work? The filter simply increases the intensity of each pixel's red and blue color component. Below I have given my selfie a redder shade, by increasing the value of the red color component in each pixel speech triple.

Each pixel's red color component has increased by 20%.
2. Brightness
Many photo applications have a slider where you can adjust the brightness of the image. Behind the scenes are the number triples (0, 0, 0) and (255, 255, 255). The number triple (0, 0, 0) corresponds to a pixel that does not contain any color and therefore is completely black, while the pixel (255, 255, 255) contains the maximum intensity of all colors and therefore is white as snow. If you want to increase the brightness of your image, and make your face emerge from that treacherous shadow, you can make each pixel whiter by letting its number triple approach the intensity (255, 255, 255). When you increase the pixel's color intensity in this way, you achieve the same effect as when you turn up the dimmer to the living room lamp – you get to see the image in a new light. Below, I have increased each of the pixel's color components by 50%.


Each pixel's color component has increased by 50%. However, none of the color components can exceed 255.
3. Grayscale
Have you used any of the Mono, Moon or Willow filters? Then you have transformed your colorful beauty into a grayscale version. Such a transformation is actually a relatively simple thing, once you know that a grayscale image only associates a single number to each pixel. That number is a measure of the pixel's light intensity and goes from 0, which is pitch black, to 255, which is white as snow.

One way to calculate the light intensity of a colored pixel is to calculate the average of the three color intensities red, green, and blue in the pixel's number triple. If we do this for the pixel at the top left of the original image, we get: (195 + 136 + 120) / 3 = 150, where 150 is a measure of the pixel's average light intensity. If we then assign this value to the pixel, it becomes gray with just the right strength. An unexpected achievement for a regular average!


4. Sharpness and blur
If you have ever dragged a finger over a pencil line, you know that the pencil grains spill over onto the nearby white areas and create a blurred effect. In photo editing, the same sharp idea is used to create blur. Just like in pencil drawing, the colors of nearby pixels are allowed to influence each other so that sharp edges and large differences between them are evened out. One way to do this, is to let the value of each pixel in the new image be the average of the corresponding pixels in the original image and its eight adjacent pixels. The animation below shows how it works.
Filters that use this method are called mean blurs. The word mean here does not refer to any rudeness, but to the mathematical hero of the method: the mean.

When we calculate the average value of the pixel and its eight neighbors, each of the nine pixels contributes one-ninth (11%) to the value of the new pixel. If we are not quite as egalitarian, but give the numbers around the pixel different weight, we can achieve other effects, e.g. sharpen the image or locate its edges. We then calculate a so called weighted average. The table to the right shows a possible weighting of the pixels.
On this excellent website, you can upload your own image and see how the weighting of the neighboring pixels affects the image's appearance.
A healthy dose of math

Many of the ready-made filters you can choose from in your photo application, use a combination of the effects we have discussed here (color tones, brightness and sharpness) to give the image extra warmth, turn it into a blue-toned grayscale or give it that retro look you were looking for. In the picture to the right, I have, for example, used both lighting and blurs to make your eye fall on Tim Chartier's excellent books Math Bytes and When life is linear, where you can read more about the mathematics behind computer graphics. At the same time, my computer has been practicing acrobatic arts with the pixel number triples. See, a healthy dose of math just by opening Instagram!
References and further reading
Chartier, Tim (2014) Math bytes: Google Bombs, Chocolate-covered pi, and other cool bits in computing, Princeton University Press
Chartier, Tim (2015) When life is linear. From computer graphics to bracketology. The Mathematical Association of America
Computerphile, How Blurs & Filters Work, Video
Loch, Francis G., Image programming algorithms, Text
Ludwig, Jamie, Image Convolution, Satellite Digital Image Analysis, 581 Portland State University, Powerpointpresentation
Power, Victor, Image kernels explained visually, Text och animering
Sinha, Utkarsh, Image Convolution examples, Text
Wikipedia, RGB color model